When you delete a file on your Mac, it goes to the Trash folder, which serves as a safety net for accidental deletions. However, accumulated files in the Trash can take up storage space and slow down your system. It is important to periodically review and empty the Trash on Macbook Pro to create additional free space. Emptying the Trash permanently deletes the files, This process is irreversible. This helps manage storage and ensure your Mac operates efficiently.
How To Empty Trash On Mac
This is the most efficient ways to permanently clear your MacBook’s Trash Bin. It is crucial to confirm that you no longer need the files in the Trash Bin before proceeding, as this action is irreversible.
Explore these top strategies for emptying your Mac’s Trash Bin:
- Right-click (Control-click) the Trash icon in the Dock and choose ‘Empty Trash’.
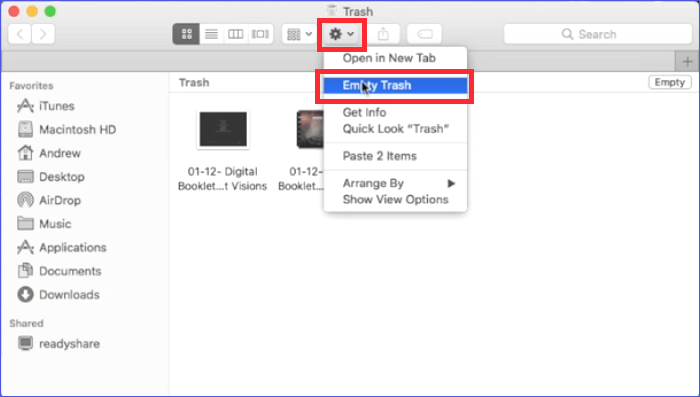
- Open the Trash folder and select ‘Empty’ from the upper-right corner.
- Right-click (Control-click) within the Trash folder and opt for ‘Empty Trash’.
- Navigate to ‘Finder > Empty Trash’ from any Finder window’s menu bar.
- Use the shortcut ‘Shift + Command + Delete’ while in Finder.
The outcome is the same regardless of the method chosen, so select the one that aligns best with your workflow.
Each method prompts a confirmation window to ensure your decision to empty the Trash Bin. For a faster process, hold the ‘Option’ key while emptying the Trash to skip this confirmation step.
How to remove individual items from the Trash can
If you prefer not to empty the entire Trash at once, you have the option to individually delete files. Similar to emptying the entire Trash, when you take this action, your Mac will permanently erase those files. Therefore, be absolutely certain that you no longer need them.
To delete specific files from the Trash on your Mac:
- Open the Trash folder. (usually located in the dock)
- Click on the file you wish to remove; you can press and hold the Command key to select multiple files simultaneously.
- Right-click (Control-click) on your selected file and choose “Delete Immediately.”

How to enable automatic Trash emptying on your Mac
To prevent your Mac from running low on free storage space, it’s essential to regularly empty the Trash. You can avoid this issue by configuring your Mac to automatically empty the Trash.
By enabling this feature, your Mac will retain items in the Trash for only 30 days before automatically purging them. It’s important to note that you should opt for this setting only if you’re confident that you won’t need to recover any deleted files from the Trash after this 30-day period.
Here’s how to set up your Mac to automatically empty the Trash:
- Open Finder and navigate to “Finder” > “Preferences” in the menu bar.
- Head to the “Advanced” tab.
- Activate the option to “Remove items from the Trash after 30 days.”
It’s worth mentioning that any files you move to the Trash from iCloud will be automatically deleted after 30 days, irrespective of whether you enable this option or not. This is because iCloud maintains deleted files for a maximum of 30 days.
How to “Force Empty” the trash on a Mac
Having trouble emptying the Trash on your Mac? Whether it’s due to files in use or system-protected data, we’ve got you covered with these troubleshooting tips to force the Trash to empty.
Troubleshooting Tips to Empty the Trash:
- Quit Background Apps: To release any file locks, use the keyboard shortcut
Command + Qto quit all apps except Finder. - Restart Your Mac: Head to
Apple>Restartfrom the menu bar to restart your Mac. Sometimes, this can resolve Trash-emptying issues. - Safe Mode: Boot your Mac into Safe Mode by holding down the
Shiftkey during startup. This can help clear any potential conflicts that prevent Trash emptying. - Recovery Mode: Boot into Recovery Mode by holding down
Command + Rduring startup. OpenDisk Utility, select your storage drive, and runFirst Aidto check for and repair any issues. - Disable System Integrity Protection (SIP): To delete certain files from the Trash, like Time Machine backups, you may need to temporarily disable SIP. Keep in mind that SIP is crucial for your Mac’s security, so remember to re-enable it afterward.
- Boot into Recovery Mode by holding
Command + R. - From the macOS Utilities page, select
Utilities>Terminal. - Type the following command:
csrutil disable. - Press
Enter, enter your Mac administrator’s password, and restart your Mac. - Empty the Trash.
- Boot back into Recovery Mode.
- Open the Terminal and run:
csrutil enable.
- Boot into Recovery Mode by holding
How to securely empty the trash
Emptying the Trash on your Mac in the usual way merely hides files and marks them for overwriting, leaving room for potential data recovery. If you handle sensitive information, you might want to take extra precautions.
In older macOS versions (Mac OS X Yosemite or earlier), Apple provided the option to “Secure Empty Trash.” This option replaced deleted data with meaningless information, making file recovery nearly impossible. To use this feature:
- Open Finder.
- Go to
Finder>Secure Empty Trashfrom the menu bar.
For enhanced data security, consider encrypting your Mac using FileVault. This adds an additional layer of protection, making it even more challenging for unauthorized users to access your deleted data.
By following these steps and tips, you can ensure that your Mac’s Trash is emptied effectively and your sensitive data remains secure.